
it is time for the SECRET of my amazing bookstagram photos (alright before you get crazy, recognize that this is sarcasm so don’t get all huffy about my huge-af ego). I realized recently that I’ve never done one of these posts, and thought that since I’ve perfected my speed of bookstagramming, I’d share it with you all! There are lots of ways to do things, so don’t feel like this is the be-all and end-all of bookstagram photos.
So as I already mentioned, if I’m going to take bookish photos, I want it to be FAST. I don’t have loads of free time (as a lot of you don’t), so I can’t spend every waking moment setting up, editing and/or taking photos. I wish I could be one of those people that has those intricate bookstacks or makes structures from books, but alas, I have no time for the clean up. So I’ve streamlined the process quite a bit to what works for me.
What I Use for My Bookstagram Photos:
- My iPhone. I have an iPhone X, which I got 100% for the portrait mode so I could take even better book photos. I have a real camera to take photos, but honestly it just ended up being too much work for me. I didn’t like the time of uploading photos onto my computer, editing, and then re-sending them back to my phone (I have a mac, so I can’t use Instagram on my computer).
Don’t fret if you don’t have a fancy camera or fancy phone! I used to use my old iPhone that had no cool photo features and honestly that was when I gained the most followers. - Miscellaneous props. I have an insane amount of props: colored paper, pom pom balls, garlands, fake flowers, fake moss, shells, chargers, figurines of all varieties, jars, bottles, and sooo much more.
These are easy to get cheap at craft stories, Dollar stores, on sale at Target, etc. And at the end of the day, don’t forget to look around your house for items. There are so many you can use!
- A more or less consistent background. I like to keep a pop of white in all of my photos. Sometimes that means the entire background is white, sometimes that means that here are hints of white. Either way, I have several white backgrounds that I like to use.
White foam boards and triboards from craft stores are awesome, cheap backgrounds. You can also get photo backdrops online to use as backgrounds (like the top one on the photo below). There is seriously no end to the creativity of backgrounds. People use shower curtains, blankets, sheets, tabletops, wood planks they bought from home stores, etc! This does not have to be expensive!

…and that’s it. I don’t use any fancy lighting or apps.
Taking the Photo:
- The first thing I do is make sure I’m taking my photos in the brightest room in my house during the brightest part of the day. I do not want direct sunlight on my photos, though!
- I like my feed to look consistent, so I set up my white-ish background (or something that will look good with my feed) and then arrange my books and/or props however it appeals to me. I don’t always use props. Photos of shelves and book stacks tend to get a lot of engagement, too!
- Take several photos, figure out which one I like the best, and do quick editing. I don’t use any editing apps (because I’m effing lazy), so I use the filters and editing tools that comes on my iPhone camera as described below.

After I’ve taken the photo, I click “edit” as is indicated here. 
I use “dramatic cool” as the filter on all of my bookish photos, so I apply that first. 
Then I lighten the photo up just a smidge (ignore my red marks in the middle of the photo, I don’t know what happened there). 
If I’m still unhappy with the photo, I’ll rotate it and/or crop it to make the composition a little easier on the eyes. 
And here you can see the difference! It’s not huge, but it’s enough that the photo looks loads better. 
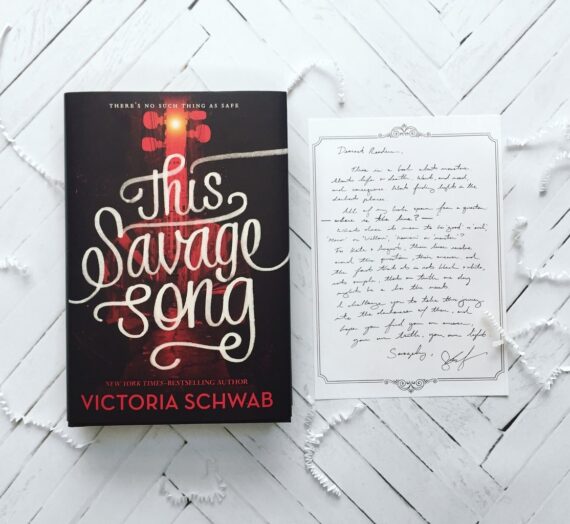
And here’s an actual bookstagram photo before and after. See how much prettier even the 10-second edits make the photo?!
Other tips for efficiency: I only take bookstagram photos once every 1-2 weeks, so I spent 1-2 hours doing it and then don’t have to do it for a while. I like to use the books I pull from the shelves in as many of the photos as possible. So if I pull a set of books to make a rainbow, I’ll take a few different rainbow photos with them. Or I’ll keep a few of the books and use them in another photo, etc. I will also do that with props – use similar props in a bunch of different photos. Obviously you don’t post all those photo back to back on your IG page, so it’s not obvious that you’ve just stockpiled a bunch of similar photos!
And that’s that! Easy peasy, yeah? Bookstagramming doesn’t have to be money intensive or time intensive, and you don’t have to have a stellar camera nor do you need a bunch of editing apps. Just find a way that works for you and stick with it!

Are you a bookstagrammer? How do you do things differently? If you aren’t a bookstagrammer, do you think you’ll try to do it now, seeing how easy it all is?

A.S. Thornton has evolved from book blogger to author with a particular fondness for writing forbidden love in ancient deserts. When not writing, she’s caring for dogs and cats as a veterinarian. You’ll never find animals at the center of her writing, though, because those fictional worlds don’t have veterinarians and her literal brain can’t accept that the poor critters would be without parasite prevention. Thornton’s debut, DAUGHTER OF THE SALT KING is available wherever books are sold.


Holly @ Nut Free Nerd
Love this post! I’m thinking about switching up my bookstagram theme soon and this gave me some great ideas for how to go about doing it. <3 Love you photos!
Ali
Thanks Holly! The great thing about bookstagram is that it’s easy and fun and switch things around (…unlike blog themes which are SUCH a pain to switch around, ugh!)
Aj @ Read All The Things!
Thank you! This is helpful. I’m a bookstagrammer, but I’m very inconsistent at it.
Aj @ Read All The Things! just posted Book Haul: From A Nice Lady
KB @ This Side of Storyland
I don’t have a bookstagram account, but if I did, I would definitely use these tips!
KB @ This Side of Storyland just posted A Look at My Bookshelf #7
Ali
thank you! (:
Greg
Great tips here! I’m new to Instagram but I’ve had fun exploring it and taking some pictures. I do need to get a consistent background, and of course I need to get more props (which should be fun haha). I just take the pics and edit on my iPhone too, I’m not motivated enough to get a fancy editing app.
Thanks for sharing these- they will definitely help me improve the quality of my images!
Greg just posted Sunday Post #259
Ali
Thanks greg! and you don’t *have* to have a consistent background, that’s just something that i prefer for my own feed (: good luck!
Cora @ Tea Party Princess
I love this post 🙂
I should probably start taking mine in batches, it seems much more efficient.
I use an off cut of lino as a backdrop haha.
Cora | http://www.teapartyprincess.co.uk
Cora @ Tea Party Princess just posted Ascension by Victor Dixen
Ali
It’s sooo nice! It ends up saving me a lot of time (:
stephanie
THIS IS SO HELPFUL! I’ve been mostly using my bookstagram account as a means to market my BookTube account but I’m trying to expand on that account so all of these tips were super helpful to me.
Thanks for sharing!
Ali
thank you! i am so glad to hear it will be of some use (:
Dancing Out of August 2018 – A Dance With Books
[…] Red Rocket Panda shares how they met the genre Science-Fiction. ⌘ Ali from The Bandar Blog shares how she takes her bookish photos efficiently. ⌘ Shannon at It Starts at Midnight responded to the TTT back to school prompt with a Teach This, […]
Ellery Alouette
How do you add the transparent box where you write on the pictures? Like where you said. “Bookstagram: How I Tke My Bookish Photos”
A.S. Thornton
I use the free the version of Canva. You can upload a photo, add a shape over the photo, make the shape transparent and then add text on top! Canva offers A LOT of design flexibility, so it’s a great tool 🙂